
These are my notes, etc. pertaining to the roof motorization/automation
7-23-11, Motorized Roof:
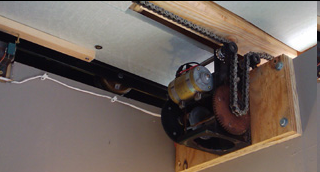
This past Saturday I worked on automating the roll-off roof. My first attempt (June ’11) at doing this didn’t go well. I tried to use a winch with steel cable. The cable was wrapped a couple of times around the drum and the ends were attached (spring-loaded) at either end of the roof. The steel cable would walk to one side of the drum and overlap causing a jamb after only a few feet of motion. I gave up on this arrangement and decided to try roller-chain. The real trick is doing all of this without spending too much money. The winch I bought for the failed attempt had a compact planetary gear drive and was not readily adaptable to driving or mounting the sprockets necessary for roller-chain. So, I looked at gear-motors. After searching on the ‘net for a good long time I came to the conclusion that they were all too expensive. Fortunately, I also had an old “Haul-Master” winch sitting in the garage. These still appear to be sold by Harbor Freight and are very cheap as winches go (about $50).
The closest winch I see on the web is the “EW2000” at autopartswarehouse.com, it appears to be identical. Another that might be the same (with a different case) is the “Master Lock 2953AT” on Amazon. Finally, I’d guess that the Harbor Freight Haul-Master branded “Item # 96455” might work too.
And btw, the motorized roof is still working fine after many dozens of cycles… some with additional snow load and the outside rails iced over, etc.
Basically, I removed the case and added a sprocket to the winch drum shaft on the outside of the steel cage. To guide the chain down from the ceiling level, at the cage top I added two free rotating 1/2″ steel shafts (on bushings) with sprockets. All parts were purchased from McMaster-Carr. This required drilling (hole saw) four 3/4″ holes in the cage (for the bushings) and assembling the parts, it took about an hour. Then I mounted the winch to the wall and ran the #40 roller chain from one end of the roof, through the winch/sprockets, to the other. It took some time to tweek things so it all lined up perfectly, but it works very well. Email me (my address is at the bottom of this page) if you want the complete list of parts (From Mcmaster-Carr) to convert the winch. I used a Microcontroller to control the motion, but relays could be used just as easily. This is a pretty low cost solution, at about $150 in materials ($200 if you need to buy the winch). I plan to implement speed-control and motion sensing (hall-effect sensor picking up a magnet on one of the winch gears) for the roof-drive in the OCS. This and limit switches as a backup should provide a fool-proof system for opening and closing the roof from anywhere.
9-4-11, Motorized Roof limit switches and power MOSFET control:
I finally had a day to work on the roof control electronics and software. See where I got the mechanical arrangement working. The first thing I did was to debug the preliminary circuitry I put together. The MOSFET power transistor that helps control the speed of the DC winch motor was not switching correctly. Turns out that the MOSFET (N-Channel) ground plane was not tied to the logic ground and that was causing the problem. So after experimenting with some PWM (Pulse Width Modulation) to make the roof move at a speed I liked, I started working on limit switches. These sense the position of the roof at the limits of it’s travel. I mounted the switches and wired them in, then on the ceiling I mounted two 16″ 1×2’s with screws positioned to hit the switches as needed. The Arduino microcontroller looks at these switches to stop the roof motion when fully opened or closed. They also give an indication of the state of the roof so that motion is only allowed to start in the correct direction. I still want to add an hall effect sensor to pickup magnets on one of the winch gears. That will let the Arduino know exactly where the roof is in it’s travel, and then use the limit switches as a backup. I could even use this in a feed back loop to dynamically adjust the power to keep a steady speed. The current arrangement is not exactly “fail-safe”, but I believe no serious damage to the structure would result if the motor continued to run past it’s limits.
So, anyway, the system works as planned. From the OCS web page I just press the roof open or close button and that’s it away it goes. As a side thought, I have a wall switch wired to the Arduino for lights and it will be dual purposed for local roof operation: on/off/on *or* off/on/off toggles the roof state – if open, close it. if closed, open it.
9-17-11, Observatory Automation, Systems Debugging:
This weekend I looked into trying to get a reliable internet connection to the observatory (via wireless) and to get the telescope to maintain it’s alignment with the park feature in the Autostar 497. This would allow me to operate and use the telescope from any internet connected computer via VNC/RDP or similar software.
My first problem was encountered when looking into the Autostar firmware patch kits. These enable additional features that Meade doesn’t provide. One of the features that I was hoping for was the ability to park the telescope in an orientation other than the default (pointing directly at the NCP). I need to park the scope with the tube parallel to the ground with the RA axis at an HA of 6 or so (this is a LXD75 GEM). Unfortunately the patch kit documentation says that most of the patches don’t work for GEM (German Equtorial) mounts. The only one that seems to be available for my mount is the [ParkAlt] patch and that wouldn’t get the scope to a low enough position for the roof to clear. I see two options…
1. Use the [ParkAlt] patch and adjust the pier height to allow the roof to clear.
2. Use the Landmark feature to position the scope and add a finder with ccd camera to manually align on power-up.
I’m leaning towards #1, testing will need to be done though.
The second problem was with remote operation via the wireless/internet. Download speeds were fine, but upload speed only seems to make it to about 200kbps (of my 768kbps DSL speed). This is not really sufficient, so I need to explore and determine where the bottleneck is. I checked this again and can transfer files at about 10x that speed across the wireless in the upstream direction. So it appears that my DSL is the bottleneck.
And finally, I noticed that the MOSFET transistor used for speed control of the roof is no longer working. The roof still moves fine, just goes a little faster than it should. I knew that big DC motor was going to be tough to drive, guess I’m adding a protection diode and a higher rated MOSFET. Trial and error.
So, I have some work to do. Next time I get a chance I’ll check the ParkAlt patch to see if it seems to work, and if it does I’ll disassemble the pier extension and bring it to work so I can shorten it (not looking forward to that task). I’ll also fix the MOSFET and make sure the roof is working correctly again. Finally, I’ll dig the trenches for the electrical and possibly network cables so I have power and a fast internet connection for VNC/RDP. 10-1-11, Observatory Automation, Systems Debugging:
I measured and calculated the new pier height and took the pier extension off for reworking. When done it will allow my 10″ F4 Newtonian to be parked sideways (with the Autostar 497 [ParkAlt] patch) on the LXD75 mount and still have room for the roof to clear it.
Next, I checked the internet connection again. The speed seems to be the same in the house directly connected via wireless (no wireless bridge). So I logged into the DSL modem, it has very good SNR on the phone line and is operating at 768kbps upstream as it should. However, it’s reporting rx errors on the ethernet port of the modem. That would explain why I’m getting such poor upstream performance. I ordered a new modem and have another wireless access point already. I consider this problem fixed.
Finally, for the roof speed control I replaced the defective/fried MOSFET with a new one (NXP Model# PSMN4R6-60PS,127). I didn’t use a flyback diode across it, as I’m still not really clear if it would help and it’s a bit of a pain to add to the wiring at this point. The new device is rated for higher voltage (60V breakdown) and current (100A) and has a better performance at the 5V signal level to it’s gate. This is ten times the switch that the old one was, in-fact, looking at the spec sheet for the old one I’m surprised it lasted more than 2 seconds.
(2/14/2012) The above MOSFET, etc. is still working fine. Will update this if/when it fails.
(4/16/15) The above transistor died not too long after the above comment, it was replaced with a STP165N10F4 which is rated at 100V breakdown and 120A. Its been working for several years now.
10-6-11, Observatory Automation, Systems Debugging:
I reworked the pier extension today, it’s now 12″ high instead of 26″. This will solve the roof clearance issues during automated/remote operation. As for visual observing, I think it’s going to work out better for that too. The eyepiece position was a little too high for me when the ‘scope was pointing near the Zenith – and I’m 6’1″ tall.
10-15-11, Observatory Automation, Systems Debugging:
The pier extension is mounted back up and the telescope is in place. The roof clears both my 10″ and 4-1/4″ telescopes in the sideways park position. Too bad the weather was so poor on Saturday night. But, I did a rudimentary polar alignment and got the camera focused pretty well. I also installed the new DSL modem and the upstream bandwidth is about 3x what it was, so the old modem was indeed bad. Wish it was a bit faster than 768k, but it’s good enough to remote control everything from another location now. I will be trying it out (remotely) as soon as the weather allows. Next time around, I’ll have to make some adjustments so the telescope tube is orthogonal to the mount’s RA axis then run the calibrate and train routines on the mount. I’d bet that my gotos get much better then.
10-17-11, Trial run:
Since the weather took an unexpected turn for the better this night I tried using the observatory remotely. So, from 270 miles away I opened the roof and powered up the telescope. I was able to use the telescope to aquire images, but due to my poor polar alignment and lack of drive training/etc. I had problems with the pointing accuracy of the telescope/mount. It’d get close, but not close enough to find things easily. Still, I would call it a successful dry run as everything worked as expected and the problems encountered can be easily solved. So I powered off the telescope and closed up the roof. I plan to use plate-solving in the future to improve the pointing accuracy and have installed “astrometry.net” in a virtual machine running Centos on the Observatory computer. Now, I’m just waiting for clear skies.